10 Tips to Get The Most Out of the Sony A7R V

The Sony A7R V is an insane camera, but it’s still possible to get terrible results if you don’t understand the quirks of the camera. Let’s go over the 10 things to get the best results out of the Sony A7R V.
1. Shoot in 8k, but know the limitations
First up, if you’re going to shoot in 8k with the Sony A7R V, be sure to realize it’s limitations. You’re only able to record in 24p. It’s capped at 30 minutes. The footage is 10-bit, but 10-bit 4:2:0 and you’re unable to export 8K raw out of this camera. You can shoot 4K 60 with the ninja V plus, or 4k 30 to the ninja v.
- Pros
- Can recompose 4K footage, edit in 8k for crazy resolution.
- Cons
- Only 24p
- Rolling shutter is very distracting. Best for stationary shots.
- Capped at 30 min
- 10-bit 4:2:0
- RAW is capped at 4K 60. Not able to shoot 8K raw.
- 1.24 crop
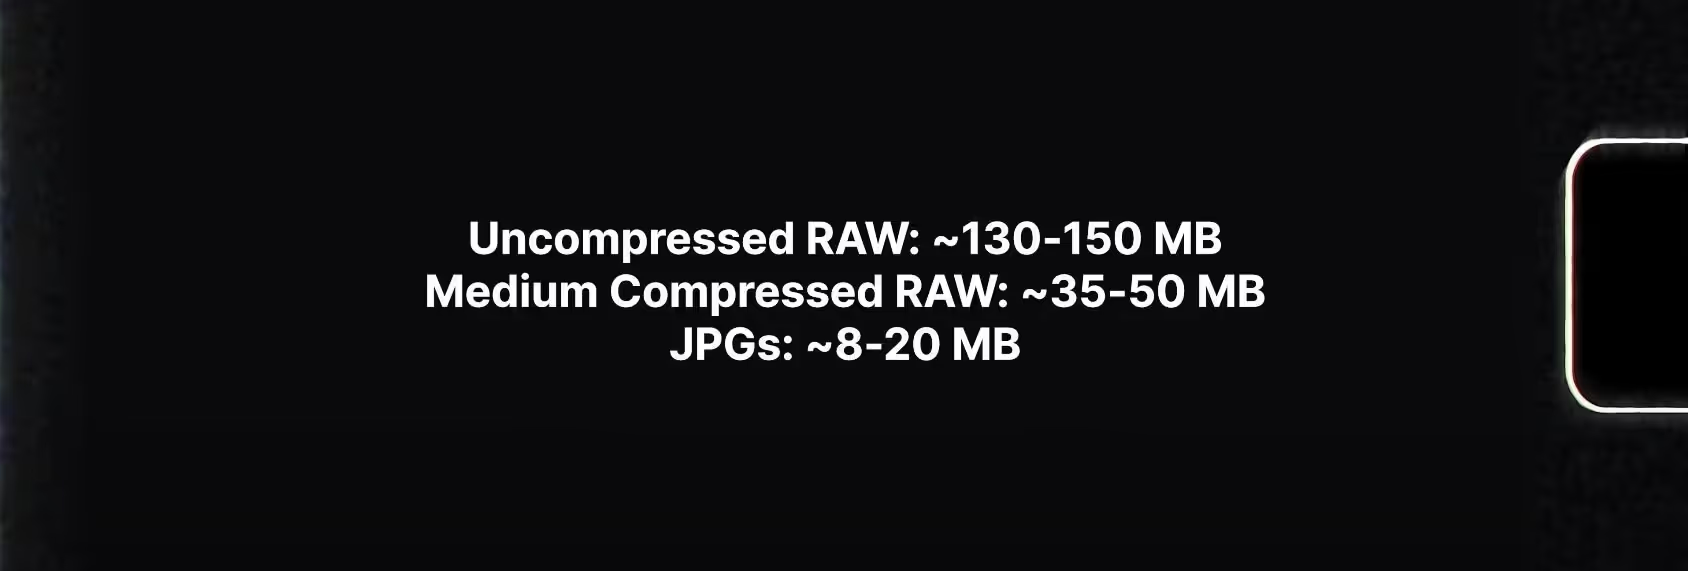
2. Do you need to shoot uncompressed RAW with this camera?
I haven't been able to see the difference between the compressed and uncompressed RAWs when editing the images from the Sony A7R V.
Here are the file size differences between a RAW photo at different compressions.
I haven't screwed up a photo so bad that I have to pray that I can save it in the edit, but that being said, I was able to pull some highlight detail out of a very backlit wedding venue with the Medium compressed raw files. After shooting a wedding of a few thousand images, I was very thankful that I was using Medium compressed raw instead of uncompressed RAW due to file sizes alone.
3. Use the correct memory cards
When it comes to storing the giant files coming off of the Sony A7R V, using the correct memory cards are going to be very important, but will actually vary on what kind of footage or photos you’re shooting.
If you’re shooting uncompressed RAW+JPGs, you’ll want to shoot with at least a v60 card. If you shoot photos quickly, you’ll want to make sure you have a v90 card. The best card would be the CF Express Type A cards, for shooting many burst photos, and will also transfer the photos to your computer faster as well, but those cards are much more expensive than SD cards. If you can afford them, great, but don’t feel like you have to buy them.
For video, it’s a little more black and white, depending on which codec of video you’ll be shooting. Here is a graphic, along with the speeds of the SD or CF Express cards that you can pause and see what cards you need based on what you're shooting.
Faster cards may cost more, but they allow you to take full advantage of this camera's features and also allows for faster transfer speeds to your computer after the shoot.
4. Configure your AI Autofocus Modes and Targets
The Autofocus on the Sony A7R V is one of the features that sets this camera apart. The autofocus locks onto subjects with very precise eye and subject tracking, but in this camera you can select different kinds of subjects. You can configure the autofocus to detect human, animal, bird, insect, car, train or airplanes in the subject recognition menu setting. I’ve used human for all of my videos and photos with this camera, however I did flip this into animal and it locked onto my dogs eye and tracked it, even when she turned her head away. Then it switched to face detect autofocus when she turned away.
Make sure to set your subjects appropriately though, because switching to human, and filming my dog, the autofocus did not work at all. So if you’ll be switching between subjects often, I’d set Subject recognition up to a custom key for quick switching,. I can see that being very frustrating and missing a shot if you’re on the wrong subject type.
5. Turn on Shutter when Power Off
My fifth tip for the Sony A7R V is to turn on the Anti-dust function in the camera to avoid any dust getting on your sensor, however, know that this will save you from dust, but if you put the shutter down and damage the shutter, the camera can’t properly work if the shutter is damaged and can’t get out of the way. Not to be dramatic, but you don’t want to damage your shutter, but you also don’t want to damage your sensor either, and this can potentially save your sensor from getting dust on it. Go to Menu, Setup Option, and Anti-Dust Function to turn this on.
Now when your camera is off, the shutter will slide down to protect your sensor.
6. Beware of the crops
My next tip is to be aware of the crops when filming with this camera. Shooting in 4k 60 or 8k 24 has a 1.24 times crop. Active stabilization has a 1.1 times crop. Focus breathing compensation has a crop based on the lens too. So if you’re using these features, just know you’ll be cropping in on your images. Not the end of the world, but something to keep in mind.
7. Use clear image zoom
Clear image zoom is a great way to get some extra reach out of your lenses without any loss of quality. I love using it when I was using my 100-400 to shoot a photo of the moon. I wasn't able to fill the frame with the moon, but with Clear image zoom, I was able to get more reach out of the same lens, while still shooting at 4K.
I’d recommend setting a custom button for this, I use the directional button on the back. To do this go to setup, operation customize, zoom and select clear image zoom. Then we’ll have to select our zoom method to be Clear Image Zoom instead of optical, or we’ll get an error.
Now we can click the directional button in, then zoom by moving the button as well.
8. Silent shooting
Know when to use the silent electronic shutter and when to use the mechanical shutter with the Sony A7R V. I was shooting with an external flash, and had my camera on silent, but I wasn't able to trigger my flashes in silent shooting. You’ll have to use the mechanical shutter for that.
If you're using silent with fast moving objects, the photos will have a rolling-shutter-like look and distortion to them. And certain kinds of lower-quality lights will have those scan lines with the silent electronic shutter because even though the shutter speed may be faster, the actual read out of the sensor is slower, so you’ll have to switch to the mechanical shutter to remove those weird scan lines.
Compressed RAW
- Mechanical: 10
- Electronic: 7
Uncompressed RAW
- Mechanical: 7
- Electronic: 5
9. If using the app, turn off the camera when switching between photo and video mode
My next tip is saving time using the Sony Imaging App. I always use this when I’m shooting thumbnails for this channel since I don’t have to get up to shoot the photo. Sometimes, however, I want to grab a quick video clip too. This might be a bug in the app now, but if you want to swap between the photo and video modes, you have to shut down the camera. Exit the app, power on the camera in the other mode, then reconnect using the app. This is a pain, however, the app does connect to your phone much faster compared to older cameras that it’s not as annoying as it sounds.
Connecting the same sony app to older cameras took forever, with multiple errors and time-outs. This camera asks to join and then connects quickly. The app's functionality is limited, but it works great for using it as a screen and remote shooting. I just wish it wouldn’t glitch out when switching modes.
10. Don’t be afraid to lean on the stabilization to lower your shutter speed in low light
The 10th tip for the Sony A7R V is don’t be afraid to lean on the stabilization of this camera. Everyone can picture how this translates to everyday photos and videos, but I noticed this has allowed me to get slightly longer shutter speeds in low-light situations.
I know this camera isn’t great in low light, compared to some other Sony cameras. However, when shooting photos, I’ve noticed that if I’m using active stabilization and shooting video of slow-moving subjects, that I can get away with lower shutter speeds as long as I keep the camera very steady. You’re not going to achieve A7S III levels of low light, but the better stabilization in this camera offers some more leniency with low light scenarios.
11. Know the base ISOs
As a bonus, keep in mind the Sony A7R V base ISOs for filming in Slog3. The jump isn’t as great as other cameras, but the second base ISO will help you get cleaner footage in low light. The dual base ISOs for the Sony A7R V are 800 and 2500 in Slog 3.
Slog3 Base 1: 800
Slog 3 Base 2: 2500