Viltrox NexusFocus F1 | Autofocus PL to E-mount Adapter is Finally Here
50% off your first year of Audiio Pro with code KEITH100
Introduction
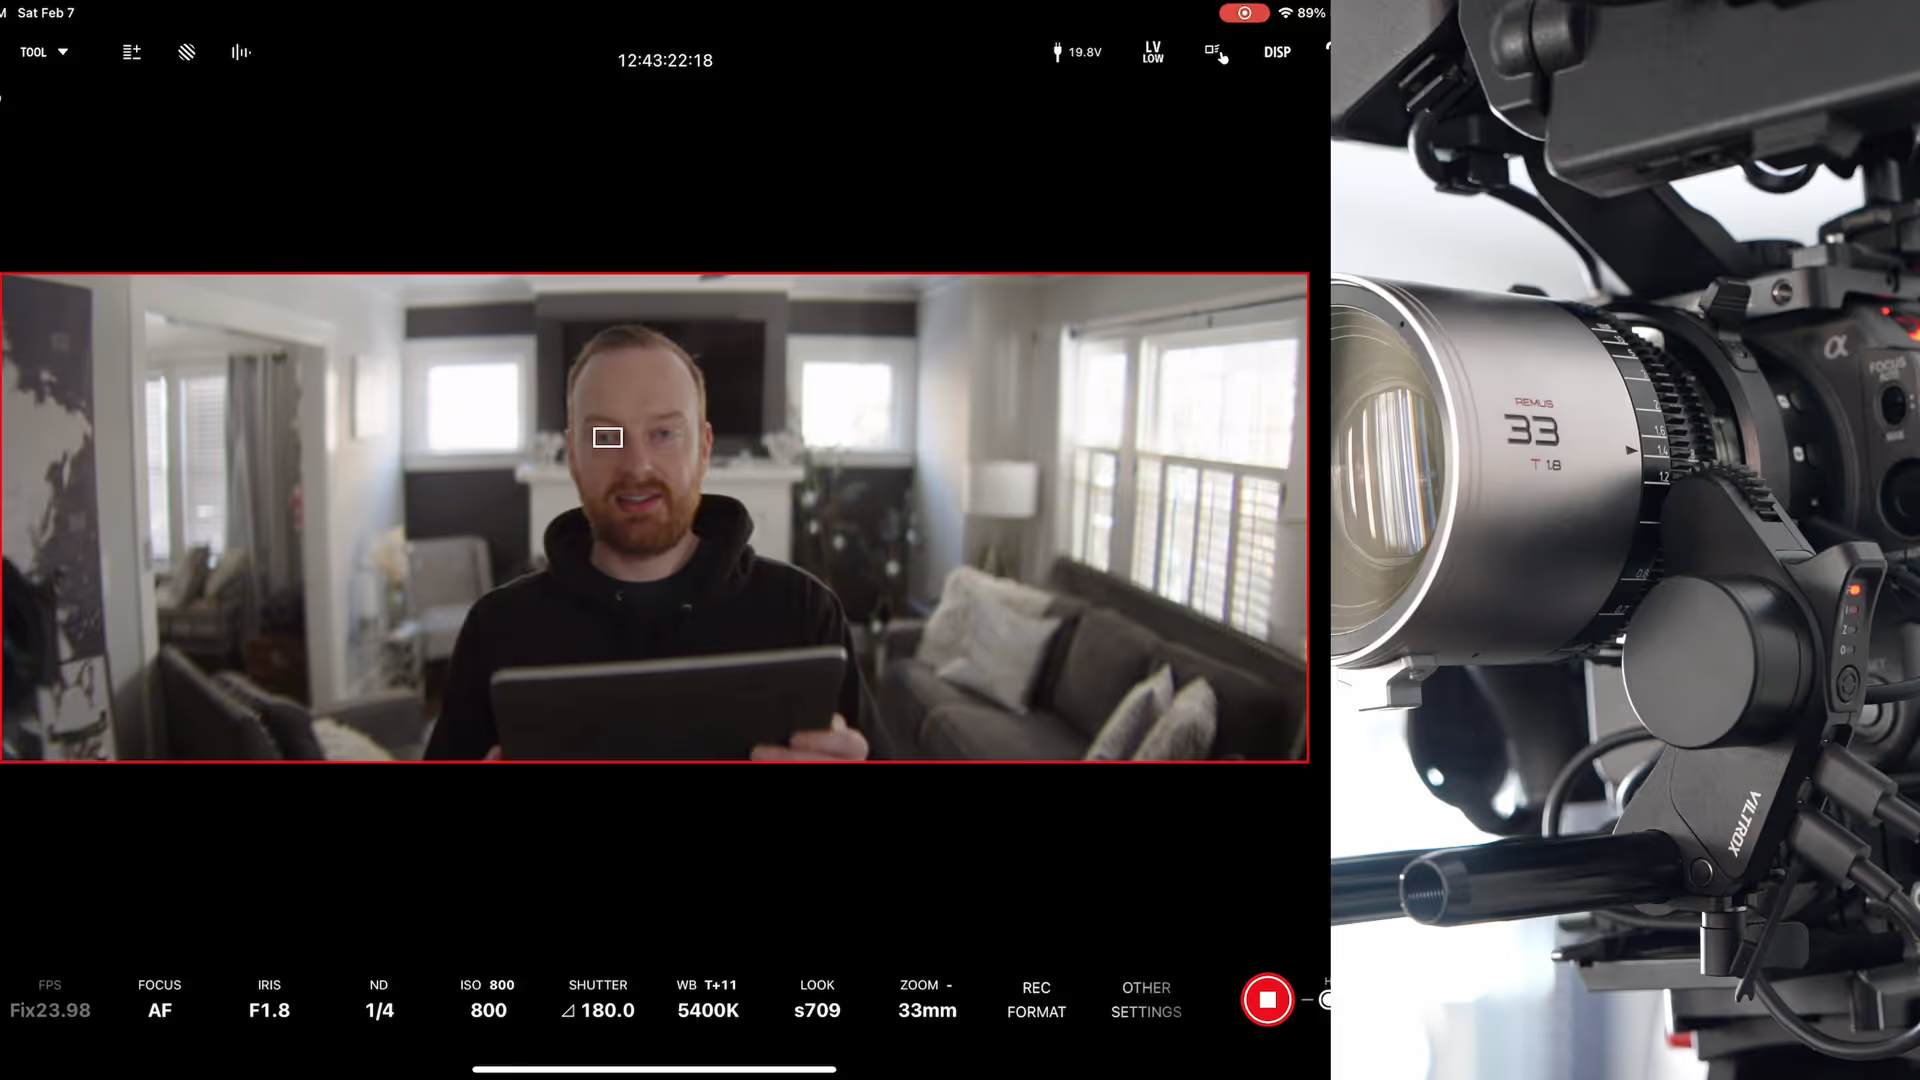
This is the Viltrox NexusFocus F1 PL to E-mount adapter with the autofocus motor on the Remus 33mm at T18.
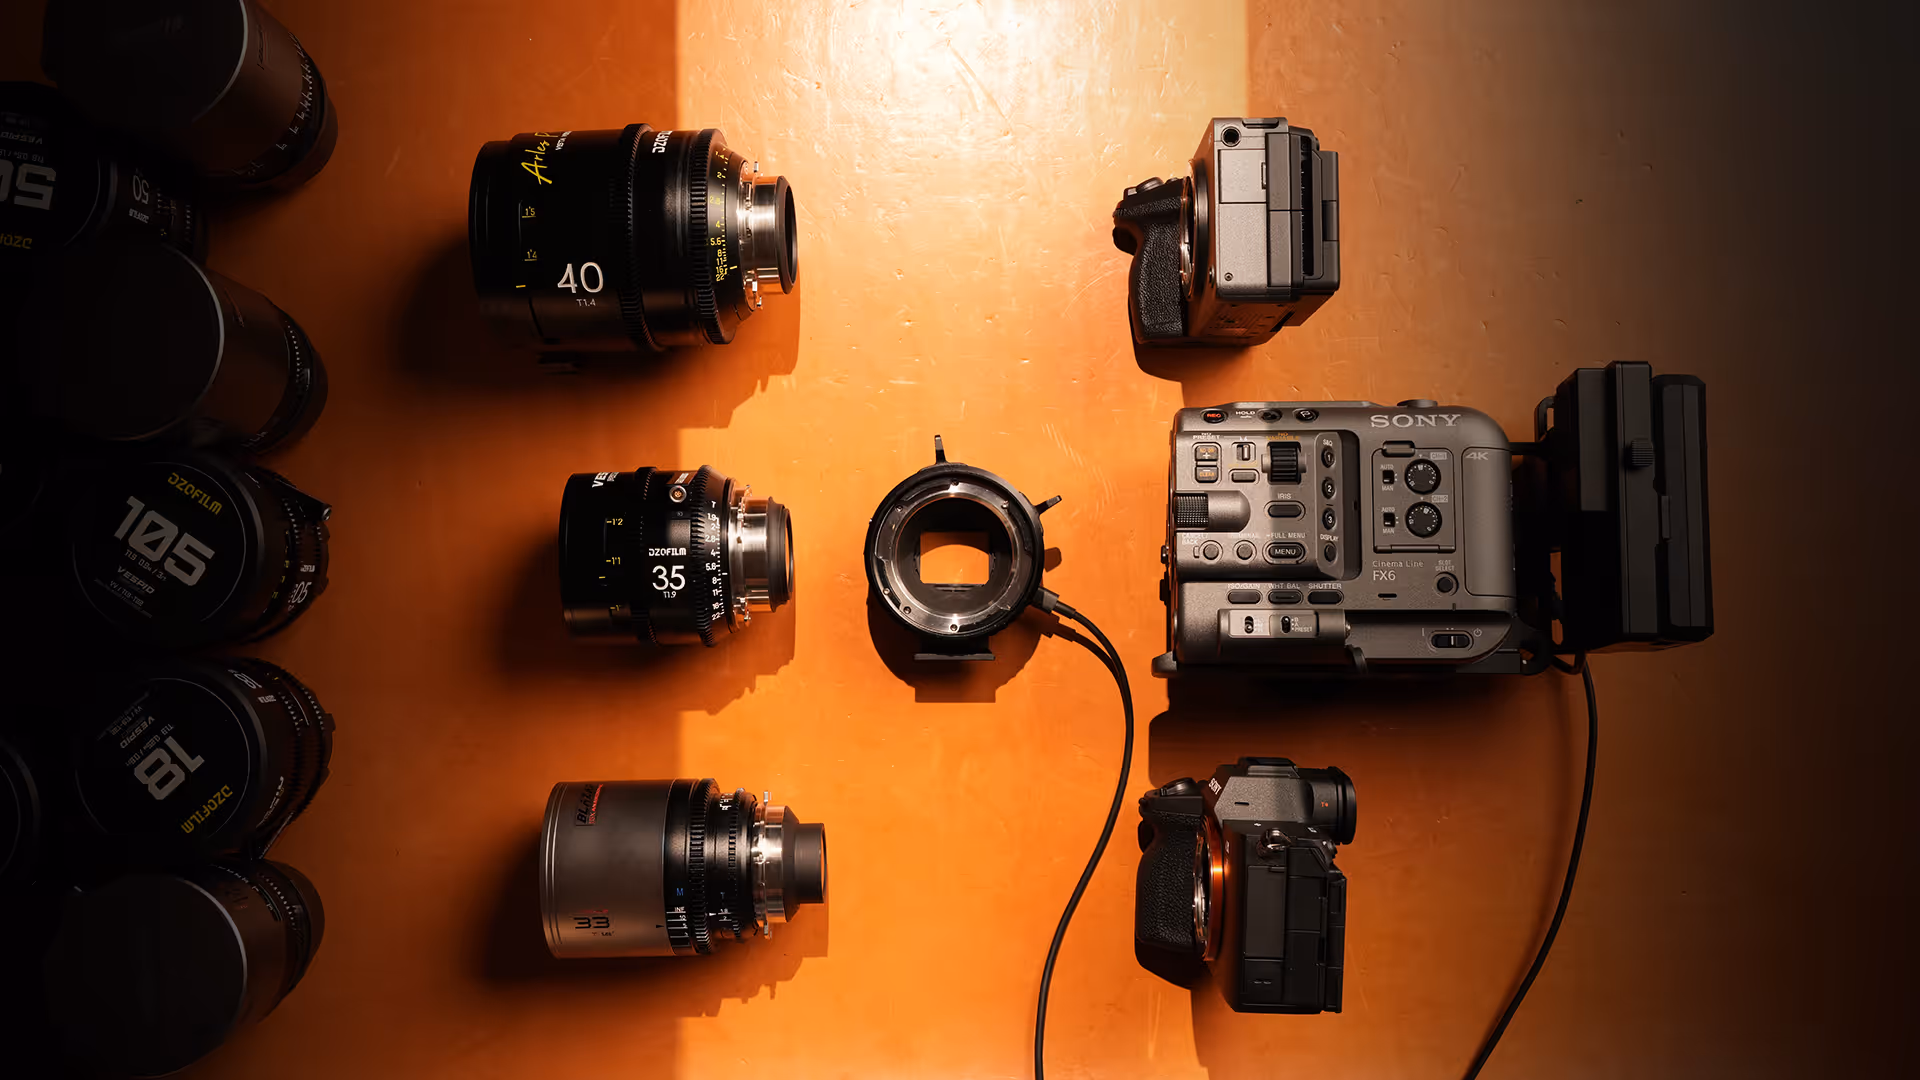
There's a lot to go over with this adapter. I've configured all the Remus lenses, and shout out to Miles for letting me borrow the B-set. I also have the Vespid 2’s, and I set up all of those in this adapter as well. All said and done, I have about 13 lenses in this adapter. This is a new product, so there's not much documentation out there. It was a lot of me stumbling around in the app and going, to the manual and to their quick start guides.
I suspect this will be smoothed out in the future, but it took me about 3 hours to figure out how to properly calibrate a lens. And then it took me about 10 to 15 minutes per lens to calibrate them. So, the fact that it's tracking me makes me feel like all of this setup was worth it because it is tracking me and we're wide open at T18.
The first thing I did, I just put a lens on here. I put the 35mm Vespid 2 on and did not calibrate it. I just put the iris in focus motor on it and it did seem to work, but it seemed like it was guessing a lot with the focus. Once you calibrate it, it actually seems pretty smooth.
Autofocus tests
For the Autofocus tests, I setup a scene in a bathroom, and focus on Ashley looking into a mirror. I jumped back and forth between her and her reflection, and a stall in the left-hand corner of the frame.
Remus 33 Low Light Autofocus Test
For the Remus 33 and 85, the anamorphic de-squeeze settings on the FX6 were not available in-camera, and to have autofocus available. This is an issue with the FX6, but were using the internal Sony autofocus, so were are autofocusing on a squeezed anamorphic image. The center of the frame retains the tracking very well, while the closer you get to the edges, the camera struggles to keep eye detect autofocus, and switches to face detect. Toward the extreme edges of the frame, we lose face detect on the squeezed image.
Lens Swap to Remus 85mm
When swapping lenses, I've just been using the app because it's a little bit easier - the screen on my bright tangerine top plate partially blocks the screen.
Using the app to swap the lenses is easier, in my opinion. Go to you library of lenses, select the down arrow. This will send the lens data to the adapter.
We’ll have to power cycle the camera, and when we turn it back on, the new lens is loaded into the adapter.
To me, this is easier than using the buttons on the adapter to select which lens you want to use. Especially after you get 10+ lenses into the adapter.
Sponsor: Audiio
Before we get into more tests, I want to thank today's video and article sponsor, Audiio.
Audiio offers an extensive catalog of music, stems, sound effects, voices, and AI search tools at a great price. LinkMatch AI allows you to paste a YouTube or Spotify link. They will analyze it and then give you a list of similar songs that you can license in your projects.
If you'd rather describe what you're looking for, you can tell Hans AI and they will give you a list of music to choose from. I love these tools because it helps speed up discovery and I can find exactly what I'm looking for for my videos.
Audio is offering $100 off of Audio Pro. You can use the link in the description or my code keith 100 for $100 off.
Thank you Audio for sponsoring the video above, and this article.
Vespid 2 35mm Autofocus and Low Light
Now we're on to the spherical lenses. This is the Vespid 2 85 mm.
(Check out the video for the actual autofocus test)
The summary of how the Vespid 2’s performed, was they seemed to work throughout the frame a lot better than the non-de-squeezed footage from the 1.5x anamorphic Remus’.
In proper lighting, they worked well with racking focus using touch tracking and using face or eye detect autofocus. Very impressed!
Where things got interesting, was when using these lenses in low light. The less light and contrast that I had on Ashley, the more the Viltrox NexusFocus adapter and lenses struggled to keep her in focus. It wasn’t doing huge focus racks, but it would juuuuust barely miss focus on her.
After watching the video on YouTube, it’s a little less obvious than what I was looking at the source footage in DaVinci Resolve - but it’s still missed focus just a little.
I think the next improvement for this adapter would be to focus on low light autofocus on moving subjects, but thats a tough scenario for most autofocus lenses. I don’t think this adapter performed bad by any means, I think this is usable is proper lighting, but I would love to see improved performance in low light scenes.
Bright Light Autofocus Test
Onto a brighter test outdoors, check out the video for the actual autofocus tests, but in summary - both lenses did great in bright lighting.
I had the max ND on the FX6, and both lenses were around T4 to T5.6, to get the proper exposure. The snow was reflecting a ton of light, so it was a good test in bright environments.
Both lenses did great with no hunting of autofocus when Ashley was in the frame. There was a little lag when she stepped out of the frame, to focuing on the background.
My autofocus settings on the FX6 were 6 for the autofocus speed, and 3 on the subject shift sensitivity.
I suspect increasing the subject shift sensitivity would have increased the speed on shifting from her to the background.
How to Add a Lens to the NexusFocus App & Adapter
I know this is early days for the Viltrox adapter. I've had to actually go through and add all of my lenses. I'm working on the Vespid twos right now and I have the 18, 24, and 35 in there. I just got done doing the 35 and I was going to start doing the 50. So, I figured I might as well just make a quick overview video of how to add a lens to this system.
Let's start off by adding the lens. After you put in all your lens data and your close focus, the next thing you do is calibrate the aperture scale.
The Vespid 2 50mm is T1.9 to T22 (I said 11 in the video, it’s T22).
And this part's kind of crazy. Calibrating the focus scale, you manually turn the dial and input the aperture values. (Better illustration of this happening in the video)
For the focus parameter calibration to start off like set your camera to movie mode, autofocus, center fixed, make sure the test chart in your camera are on the same axis and make sure the focus is peaking on your monitor.
That's why I have my small HD monitor here set to my focus. So if anything is in focus, it's in red.
After doing the focus parameter calibration, it'll run through all of the aperture ranges and focus and go to the next one.
So this is a little time consuming and tedious, but it is just part of the process.
Very important: One thing I did not mention in the video, is that you need to make sure your focus chart and the camera are far enough away for the calibration to work properly. The motors focus by racking to minimum, then finding focus (the peaks on the focus chart). If your camera is too close to the chart, you wont get a proper focus calibration from minimum (the peak wont be very high on the focus chart while calibrating). This is bad if the peak is not high. Move the camera farther away and you’ll get a more accurate calibration throughout the aperture range - and the autofocus performance will be better overall.
How to Setup and Power the Motors and Adapter
Quick setup guide for the Viltrox PL to E-mount adapter. I have the Vespid 2 35mm here and I just put the focus and iris motors on already. I put them on different sides because on my smaller lenses like the Vespid 2, they just won't fit on the same side.
There's these switches that allow you to select like left or right. Make sure these are properly set, based on what your motor orientation.
(Demo in the video is better to visualize this)
For the handheld rig, you only need the DTAP to USBC. And we'll put this into the iris motor. If you're using this on a gimbal, there is a power box. I can't speak to that because I've never used this setup on a gimbal before. But for the handheld setup like I've been using here, I've only needed to use this DTAP to USBC cable.
Next, we want to take one USBC out of this iris motor and take it to the focus motor.
The last thing to do is to go from the focus motor to the lens itself.
Now we have the focus motor plugged into the lens itself, the screen on top should start whenever we start the camera.
The last thing we used was the 35mm T19, this Vespid lens. That's already populated in here. So, it's that easy to get up and running.
An Autofocus Request
I love being able to use autofocus and touch tracking on my manual focus lenses. I love the look of these lenses, but if I didn't have anyone to pull focus for me, I couldn't use them or I was like using a ruler and like not moving from the spot. It's a crazy time to be alive to have autofocus manual focus lenses.
It would be great if there was a follow focus on the side of the focus motor that if I was holding on to the follow focus, then it would be smart enough to know to not rack focus anywhere and it would let me control it.
And then if I let go, then the autofocus would take over again.
I don't know if that's possible or how that would work at all, but um it would be cool to have.
Final Thoughts
I love that technology like this exists. I never thought that I would have autofocus control over my manual focus lenses.
I have a feeling once this releases, the experience, especially of calibrating and onboarding all of your lenses into the app will only get better.
So, it's cool that this is early days and it's working this well already.
If you have any specific tests, let me know in the comments on YouTube and I will try to work those into future videos.